No products in the cart.
Hot Products Blog
How to Put In Tape-In Extensions
The Installation Process
The installation starts with washing and drying your natural hair, so it’s as clean as possible. No conditioner will be used. Second, the stylist will determine the number of wefts you’ll require. Most people need three to five tape-in wefts. But depending on your own hair’s length and volume and your hair goals, you may require more wefts (or fewer).
The hairstylist will ensure that the tape’s covering is not removed until your hair is fully sectioned. Also, it’s not good to touch the adhesive because the oils from your hand can make the tape weaker, which can cause the wefts to slip out from your hair.
Each tape-in weft is around an inch wide. One tiny strand of your hair has to be placed between each pair of wefts. In other words, the extensions have to be applied like a sandwich, with a thin strip of your natural hair placed between the adhesives on two extensions. It’s a tricky, tedious process, and only a skilled professional can complete it to perfection.
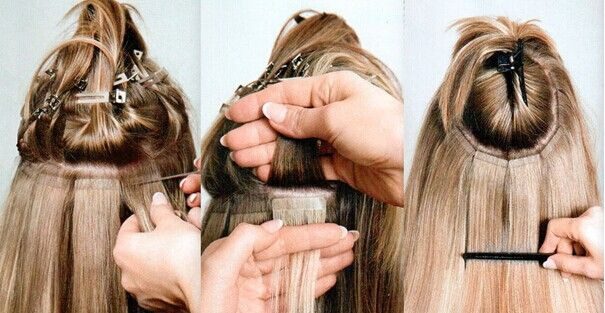
-Step1: Separated with a part of your hair horizontally just above your ears
-Step2: Make sure a section has been selected
-Step3: Tape one piece of hair extension under sectioned hair about 1/4 inch from the scalp, and peel the tape cover off
-Step4: Use comb through the tape area and make sure it is flat
-Step5: Take second tape hair piece strip and press it firmly towards the under pieces
-Step6: Apply pressure with fingers for 5-10s to secure two tape wefts hold together
Avoid Installing Tape-Ins By Yourself
Do not try to DIY it at home because it’s pretty challenging to determine the exact amount of hair that has to be placed between the wefts and then decide the alignment level for each section. Also, remember that you’re installing them to the back of your head, which can be quite tricky. How you apply the wefts will also determine if they look natural or fake so that professional installation will yield much better results.
Going to an experienced stylist is critical because even a tiny error will be a dead giveaway that you’re wearing extensions. Poor installation can also make you feel uncomfortable wearing the extensions. Another benefit of having a professional install the wefts is a seamless blending of the extensions with your hair. A perfect blending ensures no one notices that you’re wearing wefts.
Cutting and coloring are two more elements determining whether your extensions look and feel natural. Make sure to choose a shade that matches your natural hair color. The length and volume of the wefts must be coherent and in harmony with your desired hairstyles.
The best technique to make sure your wefts look natural is by placing them uniformly across your hair. It’s also a good idea to leave some amount of your natural hair exposed on the crest and sides to cover the tap extensions.
Once installed, you’ll have the extensions attached to your hair 24/7 for the next six to eight weeks. After that, you must visit your stylist to adjust and move up the wefts because they become loose over time due to your natural hair’s growth. You can reuse the wefts three or four times before they wear and will need to be replaced.


 Products
Related Posts: